iCloud basics

0 comments

iCloud basics

Those of us that have owned Apple devices for more than 3 years may or may not remember a service from Apple called MobileMe.  All you need to know about MobileMe is that it never really provided the functionality on the scale that Apple had hoped.  In 2011, Apple re-branded MobileMe to iCloud.  In the almost three years that it's been up and running, it's been a blessing to iOS users.  Offering a cloud service that syncs and backs up your content, and it works!

Why is having a cloud service important?  Simply put, every other major software/hardware vendor has one, and without it, you'd still be plugging your iPhone/iPad/iPod Touch into your Mac (or PC), and muddling through iTunes to sync and back up your content.  That is so early 2000's!  Today it's ease of use we all desire (or demand).  I can tell you, I applauded mightily in October 2011, when my iPhone 4S connected to iCloud and sent my content through iCloud to my Mac and iPad, it was an awesome moment!

So what is iCloud?  In short, it's a cloud based service that syncs your content and it is the best (and easiest)  option to back-up your iOS devices (iPhone, iPad, iPod Touch).  Let' start with syncing.  If you have multiple devices, and I'm not just talking about multiple Apple devices.  You can have an iPhone and a PC, or an iPad and a Mac, or an iPhone, iPad and Mac.  The combinations are endless (well not really but you get where I'm going).  If you have multiple devices iCloud will sync your content seamlessly as long as your iCloud settings are turned on, on the respective devices.

On the two screen captures above (from my iPhone), you'll notice most of the settings are green (or On), however I have a couple (Notes and Reminders) that are off.  The reason I have those two off is because I use other apps for my Notes (Evernote) and Reminders (Wunderlist).  By having Mail, Contacts and Calendar settings all set to on, it allows all content from those apps to be shared amongst any iCloud enabled device that I sign into with my Apple ID and Password.  So if I enter a new contact on my iPhone, iCloud takes that content to the ether, and passes it to my iMac and iPad (without me having to do anything except make sure the same iCloud settings are turned on, on those devices).  Below are the iCloud settings from my iMac.  There is a caveat for the Mail setting.  If your mail address is not an Apple email (@Mac, @Me, @iCloud), in most cases, not all, the mail setting will be grey (Off).  The reason being, if you use another mail host, like Gmail, Yahoo, Comcast or AOL, you don't need Apple to Sync or back up those systems.  Those other systems are supposed to handle that for you.  So if your iCloud account (Apple ID) is "xyz@gmail.com".  There is no need to have that setting on.  Make sense?  Good!
If you looked closely, you'd notice that on my iMac's settings, Notes is checked.  Why would I have it checked on my iMac, and not on my iPhone?  Because prior to using Evernote, I did use the Notes App on my devices, and if I turn the setting off on my iMac, it will erase the notes that are there, and I don't want to do that...:).  I also took screen captures of the Photos setting and the Documents and Data setting.

So as you can see, iCloud handles, or can potentially handle quite a bit of information.  If you chose not to use iCloud, as I mentioned earlier, you'd be stuck in iTunes hell!  

Now iCloud not only syncs your content, but, it also backs up your iOS devices.  Now, what does that mean, and how does that work you ask?  Great questions!  iCloud back ups work like this:  as long as the Backup setting is turned on (see below)

And your device is On, charging to an outlet, and you are in a wireless network, iCloud will ping your device, check when the last backup occurred (in my case 7:22 PM yesterday), and if you are beyond 24 hours since the last backup, iCloud will create a new backup for you.  Or, you can manually backup your iOS device by pressing the "Back Up Now" option if, and only if it is blue, as in the screen capture above (must be in wireless network for this to work).  Please keep this in mind.  iCloud only keeps 1 backup per device.  So you can manually backup as many times as you'd like during the day, but iCloud will only keep the latest.  Reason is because you only need 1 complete backup.  If you are charing your device, and in a wireless network, but your device is off, guess what will not happen, your device will NOT back up!  Any guesses as to why?  If you said "because when your device is off the GPS is disabled, and iCloud can't ping your device", you are 100% correct!  So, don't expect backups to occur when your device is off, because they will not!

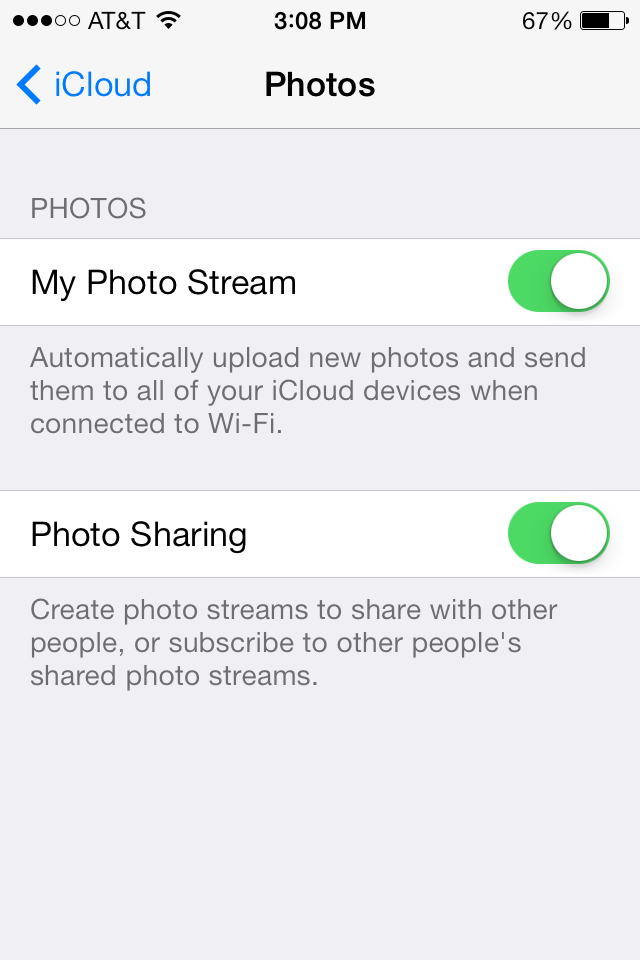
Now I wrote about Photo Stream in an earlier blog, so I'm not going to go too much into it here, except to say that you should make sure your Photo Stream settings (below) for My Photo Stream and Photo Sharing are turned on.  The Burst Photos is specific to the iPhone 5S, no other devices currently have that capability.   If Photo Stream and Photo Sharing are off, your pictures will be stuck on your iOS device, until you will manually move them to your Mac (or PC).   

Now if you are a PC users with iOS devices, don't feel left out, you can download the iCloud Control Panel for your PC, and that will allow you to sync content between your iOS devices and your PC, nice move Apple!

Another key element of iCloud, is space.  How much do you get, how much does it cost, what if you run out!  When you create an iCloud account, you get 5GB of free storage.  If you have multiple devices attached to that iCloud account, you'll run out of 5GB quickly.  You can purchase an additional 10GB for $15/yr, 20GB for $40/yr, and 50GB for $100/yr.  Honestly, the additional storage is costly considering what other services offer.  I wonder if and when Apple will lower the prices here.

Finally, and perhaps most importantly, if you have an Apple ID for iTunes, should you use that for iCloud?  My best answer here is, it depends.  If you have a family, sharing an Apple ID for iTunes, I recommend each of you having your own Apple ID for iCloud.  An example would be family of four, mom, dad and two kids.  The Apple ID for iTunes has been set up under dad's email.  Now everyone has multiple devices, and if everyone is sharing dad's Apple ID for iCloud, you'll find you have no space to back up.  Not to mention your contacts, calendar events etc, etc, etc are a combination from everyones devices!  Yuck!  So Mom, and kids should create their own iCloud account (Apple ID).  Don't fret, you can still share calendar events and other content, you'll just share what you want to.  

Well I hope this iCloud intro has been helpful.  Until next time, best to you and your devices!
Read more ►

Getting the most out of Photo Stream for your Apple devices

0 comments

Today's blog will cover the  Photo Stream part of iCloud.  Photo Stream was introduced in October of 2011, along with iCloud, iOS 5 and a new version of iPhoto (for those people running OSX 10.7, at the time).  Photo Stream was not the first photo sharing software to hit the market (There’s Flickr, Shutterfly, SnapFish, Photobucket and Picasa to name a few), but it was Apple first foray into online pictures.  Apple’s take on photo sharing was initially, as you might expect, closed to non-Apple users.  Here’s how it worked.  You’d snap photos with your iOS device running iOS 5, and when you got into a Wi-Fi zone, those pictures would magically go into the cloud and become available on your other iCloud capable devices.  I’ll never forget the first time I tried it.  Same day the iPhone 4S came out (Oct 14, 2011, I think!), I was outside taking pictures of my kids playing football.  Now I had already updated my version of iPhoto for my iMac, and turned iCloud and Photo Stream on, so when I came into the house, and my iPhone attached to our WI-Fi network, the fifty or so pictures I took, started flowing to the Photo Stream.  I came over to my iMac and opened up iPhoto, clicked on the Photo Stream option, and sure enough, the pictures I had just snapped with my brand new iPhone began appearing on my iMac!  I didn’t have to plug my iPhone in, and copy those pictures into my computer, thanks to iCloud and Photo Stream I had a copy of those pictures without having to do anything!  Nice.  I love technology when it works.  So, how does it work?

Let’s start with your device(s).  Photo Stream works with iCloud, so in order to make use of it, your devices need to be iCloud capable.   Your iOS device(s) needs to be running at least iOS 5.1 (if you are not at iOS 6, seriously consider upgrading).  Your Mac needs to be running at least OSX 10.7.5, and you’ll need iPhoto 9.2.2 or Aperture 3.2.3 or later.   Photo Stream does work with PC’s, but I will not be covering that here.    Let’s not forget Apple TV, a wonderful way to share your photos, you’ll need at least the 2nd generation Apple TV, running software updates 5.0 or later.  

The Photo Stream option on your iOS devices is located in the iCloud Setting.  To start using it, go into Settings, find and tap the iCloud setting, scroll down a bit and you’ll find the Photo Stream option, simply turn it on and start taking pictures with your device!  On your Mac, you’ll open up System Preferences, click the iCloud preference, and similar to your iOS device(s), you’ll turn Photo Stream on.  Now there is one additional step you’ll need to take on your Mac, you’ll go into iPhoto, or Aperture, and within either of those apps, you’ll turn Photo Stream on there as well.  


Now let’s talk about getting pictures in your Photo Stream, how many you can have there, how long they stay there, do pictures count against my iCloud storage etc.  Apple states that you can have up to 1000 pictures in your Photo Stream at any given time.  Apple also says you can have those pictures in your Photo Stream for 30 days.  The pictures in your Photo Stream DO NOT count against your iCloud storage, very important to remember for those who are backing up their devices to iCloud.

Deleting pictures from your Photo Stream on your iOS device is quite simple, and there are two ways to accomplish it.  You can delete a single picture by clicking on the picture, then tapping the garbage can (lower right corner of screen).  Or you can delete multiple pictures.  To do this, you tap the Edit button (top Right), then tap the pictures you wish to delete, then tap the Delete button (bottom right).  On your Mac, deleting a Photo Stream pictures is also very easy.  Either within iPhoto or Aperture, click on the Photo Stream option.  You can delete single pictures, or multiple pictures from Photo Stream, just as you would if you were in an Events/Photos/Faces or Places (iPhoto).  

Now let’s talk about sharing your photos from Photo Stream.  This is a new option that became available in the fall of 2012 with the release of iOS 6.   Shared Photo Streams  can also be created on your Mac, running OSX 10.8.2 or later with Aperture 3.4 or later or iPhoto 9.4 or later (you could and some people do, use both).   Shared Photo Stream(s) rock!  


To turn on Photo Sharing, tap on the Photo Stream option, and make sure the Photo Sharing toggle is set to on.  One great feature of the shared Photo Stream is that is can be shared with non Mac or non iOS devices, thank you Apple!  When you share a Photo Stream, it becomes a private website that you share by providing email addresses to those you wish to share it with.  Here’s how you do it.  On your iOS device, you’ll go into the Photo’s app, and choose Photo Stream, then you choose the pictures you wish to share by clicking the edit button (top right), tapping the photos, then choosing the share option, lower left of your screen.  When you click share, you have six options to share your pictures.  Via Message, another Photo Stream, Facebook, Print, Copy or Save to Camera roll.  We are going to click the Photo Stream option.  Next, click New Photo Stream, type the email addresses (or if you have them in your contacts, simply type the persons name and pick their email address).  Create a name for your Photo Stream, then you can choose whether or not you wish to make this Photo Stream public, or only viewable by those whose email you provided.  If the Photo Stream is NOT created as a public website, those people who were emailed your link, MUST  be using that email address as an Apple ID in order to view the Shared Photo Stream, this is very important.  If you make the Photo Stream public, it can be viewed by anyone, regardless of whether or not their email is an Apple ID or not.   To create a shared Photo Stream in iPhoto, from your library, choose the pictures you wish to share, click the Share option (lower right), choose Photo Stream, enter the names (or email addresses) of those you wish to share the Photo Stream with and the rest as they say, is history!  Those people who you’ve shared your Photo Stream with, who’s email address is an Apple ID, can view the pictures on their iOS device(s), as long as they are running iOS 6 or later, or on their Mac, in iPhoto 9.4 or later, or Aperture, 3.4 or later.  The shared Photo Streams can also be viewed on an Apple TV, running software 5.1 or later.  In case you were wondering, there is a limit to the number of photo’s you can share in a Photo Stream, that number is 1000.  Also, shared Photo Streams never expire, until you delete them…

So, you now know how to share your Photo Streams amongst your friend/family and me should you choose.  Have fun, and until next time, I hope you and your devices are running smoothly!


Read more ►
 

Copyright © Need a Smartphone Design by O Pregador | Blogger Theme by Blogger Template de luxo | Powered by Blogger