iCloud basics

0 comments

iCloud basics

Those of us that have owned Apple devices for more than 3 years may or may not remember a service from Apple called MobileMe.  All you need to know about MobileMe is that it never really provided the functionality on the scale that Apple had hoped.  In 2011, Apple re-branded MobileMe to iCloud.  In the almost three years that it's been up and running, it's been a blessing to iOS users.  Offering a cloud service that syncs and backs up your content, and it works!

Why is having a cloud service important?  Simply put, every other major software/hardware vendor has one, and without it, you'd still be plugging your iPhone/iPad/iPod Touch into your Mac (or PC), and muddling through iTunes to sync and back up your content.  That is so early 2000's!  Today it's ease of use we all desire (or demand).  I can tell you, I applauded mightily in October 2011, when my iPhone 4S connected to iCloud and sent my content through iCloud to my Mac and iPad, it was an awesome moment!

So what is iCloud?  In short, it's a cloud based service that syncs your content and it is the best (and easiest)  option to back-up your iOS devices (iPhone, iPad, iPod Touch).  Let' start with syncing.  If you have multiple devices, and I'm not just talking about multiple Apple devices.  You can have an iPhone and a PC, or an iPad and a Mac, or an iPhone, iPad and Mac.  The combinations are endless (well not really but you get where I'm going).  If you have multiple devices iCloud will sync your content seamlessly as long as your iCloud settings are turned on, on the respective devices.

On the two screen captures above (from my iPhone), you'll notice most of the settings are green (or On), however I have a couple (Notes and Reminders) that are off.  The reason I have those two off is because I use other apps for my Notes (Evernote) and Reminders (Wunderlist).  By having Mail, Contacts and Calendar settings all set to on, it allows all content from those apps to be shared amongst any iCloud enabled device that I sign into with my Apple ID and Password.  So if I enter a new contact on my iPhone, iCloud takes that content to the ether, and passes it to my iMac and iPad (without me having to do anything except make sure the same iCloud settings are turned on, on those devices).  Below are the iCloud settings from my iMac.  There is a caveat for the Mail setting.  If your mail address is not an Apple email (@Mac, @Me, @iCloud), in most cases, not all, the mail setting will be grey (Off).  The reason being, if you use another mail host, like Gmail, Yahoo, Comcast or AOL, you don't need Apple to Sync or back up those systems.  Those other systems are supposed to handle that for you.  So if your iCloud account (Apple ID) is "xyz@gmail.com".  There is no need to have that setting on.  Make sense?  Good!
If you looked closely, you'd notice that on my iMac's settings, Notes is checked.  Why would I have it checked on my iMac, and not on my iPhone?  Because prior to using Evernote, I did use the Notes App on my devices, and if I turn the setting off on my iMac, it will erase the notes that are there, and I don't want to do that...:).  I also took screen captures of the Photos setting and the Documents and Data setting.

So as you can see, iCloud handles, or can potentially handle quite a bit of information.  If you chose not to use iCloud, as I mentioned earlier, you'd be stuck in iTunes hell!  

Now iCloud not only syncs your content, but, it also backs up your iOS devices.  Now, what does that mean, and how does that work you ask?  Great questions!  iCloud back ups work like this:  as long as the Backup setting is turned on (see below)

And your device is On, charging to an outlet, and you are in a wireless network, iCloud will ping your device, check when the last backup occurred (in my case 7:22 PM yesterday), and if you are beyond 24 hours since the last backup, iCloud will create a new backup for you.  Or, you can manually backup your iOS device by pressing the "Back Up Now" option if, and only if it is blue, as in the screen capture above (must be in wireless network for this to work).  Please keep this in mind.  iCloud only keeps 1 backup per device.  So you can manually backup as many times as you'd like during the day, but iCloud will only keep the latest.  Reason is because you only need 1 complete backup.  If you are charing your device, and in a wireless network, but your device is off, guess what will not happen, your device will NOT back up!  Any guesses as to why?  If you said "because when your device is off the GPS is disabled, and iCloud can't ping your device", you are 100% correct!  So, don't expect backups to occur when your device is off, because they will not!

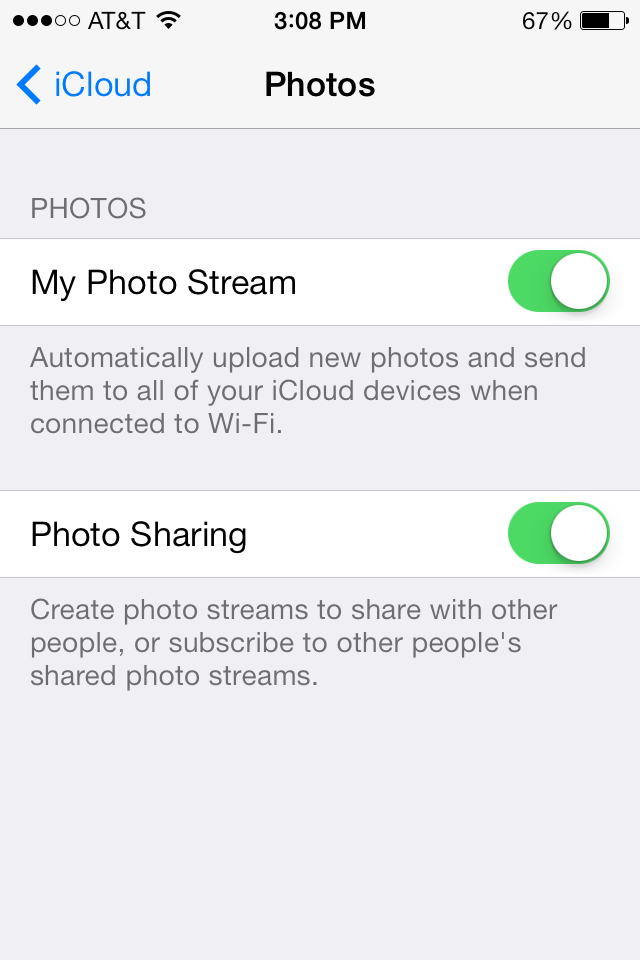
Now I wrote about Photo Stream in an earlier blog, so I'm not going to go too much into it here, except to say that you should make sure your Photo Stream settings (below) for My Photo Stream and Photo Sharing are turned on.  The Burst Photos is specific to the iPhone 5S, no other devices currently have that capability.   If Photo Stream and Photo Sharing are off, your pictures will be stuck on your iOS device, until you will manually move them to your Mac (or PC).   

Now if you are a PC users with iOS devices, don't feel left out, you can download the iCloud Control Panel for your PC, and that will allow you to sync content between your iOS devices and your PC, nice move Apple!

Another key element of iCloud, is space.  How much do you get, how much does it cost, what if you run out!  When you create an iCloud account, you get 5GB of free storage.  If you have multiple devices attached to that iCloud account, you'll run out of 5GB quickly.  You can purchase an additional 10GB for $15/yr, 20GB for $40/yr, and 50GB for $100/yr.  Honestly, the additional storage is costly considering what other services offer.  I wonder if and when Apple will lower the prices here.

Finally, and perhaps most importantly, if you have an Apple ID for iTunes, should you use that for iCloud?  My best answer here is, it depends.  If you have a family, sharing an Apple ID for iTunes, I recommend each of you having your own Apple ID for iCloud.  An example would be family of four, mom, dad and two kids.  The Apple ID for iTunes has been set up under dad's email.  Now everyone has multiple devices, and if everyone is sharing dad's Apple ID for iCloud, you'll find you have no space to back up.  Not to mention your contacts, calendar events etc, etc, etc are a combination from everyones devices!  Yuck!  So Mom, and kids should create their own iCloud account (Apple ID).  Don't fret, you can still share calendar events and other content, you'll just share what you want to.  

Well I hope this iCloud intro has been helpful.  Until next time, best to you and your devices!
Read more ►

iOS 8...A Preview.

0 comments

iOS 8...A Preview


Are you comfortable with iOS 7 yet?  If not, lets hope you get there, and quick!  Because iOS 8 is right around the corner!  On Monday during the Keynote of the WWDC Apple gave us a preview of the fantastic things coming our way this fall in iOS 8, and there are many!

Among the features that have me most stoked, are the awesome features that allow Apps to share data, or what I will refer to the Unification of your Apple technology.  Imagine you are in your home office, located on the lower level of your house.  Your iPhone is upstairs in your bedroom.  iPhone rings, and so does your iMac!  That's right, your Mac's (running Yosemite) will have the ability to answer calls from your iPhone!  Whoa, want to run that by me again fella??  You read correctly.  Oh, and did I mention that your iPad can answer that call coming into the iPhone as well?  There are some caveats to the above, your devices need to be on the same wireless network for that incredible feature to work.  You'll also be able to start an email on your Mac, and finish it on your iOS device, or vice versa, very cool indeed.  One of my favorite new features is iCloud Drive.  Apple's looooong overdue attempt to bring iCloud to the mainstream user.  iCloud Drive will add many new Dropbox/Google Drive like features.  For starters you'll be able to upload any file type to your iCloud Drive, and you can do it easily on your Mac using Finder!  Apple didn't announce an iCloud Drive app for the iPhone or iPad, but I can't imagine it's far behind.  For now, on your iPhone or iPad you'll have to go into the App the uses the particular file to open it.

Within iMessage, Apple has revealed a new push-to-talk, as well as push-to-video feature that's akin to those same services within the very popular WhatsApp and the Voxer App.  
There's interactive Notifications, which from the looks of it will be very useful.  If you get a message while you are creating a presentation in Keynote, and don't feel like going to the Messages app, you'll be able to reply directly from the Message Notification, that is cool!

There are some great updates to the Mail app, as well as Spotlight Search that I think you'll find incredibly useful

There's also a new native feature on the iOS keyboard that Apple is calling QuickType, that uses "language models" to predict words before they are typed.  How long till an App can type what I'm thinking!!  Yikes I bet that's not too far off my friends...:).  

There's a new feature called Mark-Up, which is an extension to both Mail and Safari that let's you edit attachments by drawing on them.  I'll wait to make any judgements till I use this feature.  
Here's another great feature that should help in your everyday life.  Perhaps not right away, but definitely in the long haul, Apple's new HealthKit App.  Consider it a one stop shop for all your health data that other Apps currently collect, like Jawbone's UP.  Apple has teamed up with key partners, including Mayo Clinic to help you keep track of measurements that matter most to you.  

Lastly (for now), Siri has even gotten smarter.  This is a good thing, because I've started to use Google's Now feature (found in the Google App) on my iPhone because I've found it works far better than Siri.

There will be plenty more to information on iOS 8 in the coming months prior to it's eventual release (early fall 2014).  I'd love to hear from you as to the features you are most excited about.

Until next time, best to you and your devices!

Read more ►

Merging contacts on your iPhone and iPad.

0 comments

Merging contacts on your iPhone and iPad.

Do you a contact problem on your iOS device?  Do your duplicates stress you out??   It’s practically inevitable that duplicate contacts appears on your iOS device either by accident, typos, through sharing vCard information with others, or from something as basic as a contact changing their name and addresses, for which an additional entry gets added. Prior to iOS 7, there was no simple way of handling multiple contact entries on your iOS device, but that has finally changed, and now there is an easy way to merge those contacts directly and easily!

Ok, this will be fantastic for those of you that experience DCS!  Because this is done on your iOS device, you do not need to to sync to iCloud, iTunes  or any other computer for the change to take effect, you simply make the change directly on your iOS device, and iCloud, takes care of pushing the changes automatically to any other iOS and OS X devices that use the same Apple ID.

I've got screen captures just below to assist.
This fantastic new feature is not actually called Merge, but rather Link Contacts, which is possibly why it’s  often missed, or overlooked, regardless, here is what you do!

From your iOS device, tap the Contacts app (or on your iPhone, tap the phone app) , open the contact you wish to merge another duplicate contacts with.
    Next, tap on the “Edit” button
    Scroll down toward the bottom to find Link Contacts, then tap on the green plus icon “(+) link contacts…” to link/merge the contact with another.
    Then, locate the contact to merge (either a duplicate or a changed addressee) and tap on the name, then tap on “Link” in the corner
    Repeat for more than one duplicate, otherwise tap on “Done” to finish the merging

Yeah!!  This instantly links/merges all contact details from the two (or more) contact cards into a single contact entry, it does not overwrite any information, it simply merges all details into a single contact.

In the screenshots below, the address information for multiple AT&T contacts has been merged into a single card. The first contact edited will be the one that accepts the merged details:


Once you click “Done”, there will only be a single contact for the details you merged (linked), in this example I've Merged/Linked two AT&T accounts.

One great thing about the “Link Contacts” method is that although it merges the contacts,  it can very easily be  undone if you decide to unmerge/unlink the contact details. To do that, just go back to the contact in question, tap on “Edit” and then tap on the red (-) icon along the linked contacts details.

There are other ways to Merge/Link contacts,  but I'm not going to address those here.  Today I simply wanted to point out a great feature that was added to iOS 7.

So now it's up to you!  If you are loaded with duplicate contacts, you've been given the green light to get rid of them!  It may take some time, but will definitely be worth it.  Free you device of DCS!

Until next time, best to you and your fewer contacts...:).

Merging contacts on your iPhone and iPad.

Smartphone (Handphone)

Read more ►

How to find your lost iPhone.

0 comments

How to find your lost iPhone.

(This story is told through the eyes and words of an iPhone)

The memories are foggy as to how my owner lost me, but that's not really what's important here.  What is important is that she found me, thanks to a really knowledgeable and awesome dude (The MacMentor), and a really smart mom (who kept her Apple ID and Password safe).

So here's what I remember...I was having a blast with my owner, down at the beach.  She was living it up, tanning and having fun with her friends, it was a great day!  A few hours go by, the sun started to set, and the next thing I know, she's gone!  Left without me.  I was so sad!  I didn't know what to do, so I waited, and waited and waited.  Thankfully I had a full battery charge.  My only hope was that my owner (who asked to remain anonymous here) remembered her Apple ID, and password.

So here's what happened next (I know because she told me).  My owner was so nervous that her mom was going to go berserk, but thankfully she has a Mac Guy who could help her, his name is The MacMentor (aka, Geoff Horwitz).  She called The MacMentor and told him of her terrible situation and asked him what to do.  The MacMentor asked her if she knew her Apple ID.  She gave him the ID she thought she used, and The MacMentor went to his trusty Mac, opened up Safari and proceeded to go to http://icloud.com.

Once there, he entered the Apple ID and Password my owner gave him (hidden for obvious reasons).  Sadly, he got a message back from iCloud that the Apple ID and password had not been set up!  The MacMentor shook his head in disbelief.  If iCloud had not been set up, how on earth would I (the iPhone) be found?  The MacMentor was sure that my owner had set up her iCloud, so he had her call her mom.  What happened next was just plain awesome!  Thankfully mom had written down the Apple ID and password my owner used for iCloud.  So, mom opened up Safari, went to iCloud.com and signed in with my owners Apple ID and password.

When mom did that she came to the screen capture above.  Next, mom pressed the Find my iPhone button which took her to a map, similar to the one below, but for security reasons, the map below is simply being used as an example.

It's a little hard to see, but on the top right of the screen capture above, there's a window with me, the iPhone, and underneath three buttons.  Play Sound, Lost Mode and Erase iPhone.  Mom was able to locate the iPhone on the beach where my owner had forgotten me, but it was dark out, and it would be really hard to find me!  So, mom called The MacMentor, and he told her to press the Play Sound button (I tell you, that MacMentor dude is a genius!).  This story keeps getting better!  You see, thankfully my battery still had plenty of charge, and I was still on.  So when mom pressed the Play Sound button on iCloud I started making a loud sonar noise.  And low and behold, a few minutes later, even though it was dark, my owner and her friends heard me calling her and she came and got me!  Yeah!  I love stories with a happy ending, and thanks to the wonderful MacMentor, and a resourceful mom,  I didn't get washed up in the tide and lost at sea!

So the moral of the story is this.  If you own an iPhone, make sure you sign in to iCloud, and make sure you remember your Apple ID and password!  And it would help if you knew The MacMentor as well...:).

Thanks for reading, and don't forget to keep your iPhone and iPad safe, using iCloud!


Read more ►

Getting the most out of Photo Stream for your Apple devices

0 comments

Today's blog will cover the  Photo Stream part of iCloud.  Photo Stream was introduced in October of 2011, along with iCloud, iOS 5 and a new version of iPhoto (for those people running OSX 10.7, at the time).  Photo Stream was not the first photo sharing software to hit the market (There’s Flickr, Shutterfly, SnapFish, Photobucket and Picasa to name a few), but it was Apple first foray into online pictures.  Apple’s take on photo sharing was initially, as you might expect, closed to non-Apple users.  Here’s how it worked.  You’d snap photos with your iOS device running iOS 5, and when you got into a Wi-Fi zone, those pictures would magically go into the cloud and become available on your other iCloud capable devices.  I’ll never forget the first time I tried it.  Same day the iPhone 4S came out (Oct 14, 2011, I think!), I was outside taking pictures of my kids playing football.  Now I had already updated my version of iPhoto for my iMac, and turned iCloud and Photo Stream on, so when I came into the house, and my iPhone attached to our WI-Fi network, the fifty or so pictures I took, started flowing to the Photo Stream.  I came over to my iMac and opened up iPhoto, clicked on the Photo Stream option, and sure enough, the pictures I had just snapped with my brand new iPhone began appearing on my iMac!  I didn’t have to plug my iPhone in, and copy those pictures into my computer, thanks to iCloud and Photo Stream I had a copy of those pictures without having to do anything!  Nice.  I love technology when it works.  So, how does it work?

Let’s start with your device(s).  Photo Stream works with iCloud, so in order to make use of it, your devices need to be iCloud capable.   Your iOS device(s) needs to be running at least iOS 5.1 (if you are not at iOS 6, seriously consider upgrading).  Your Mac needs to be running at least OSX 10.7.5, and you’ll need iPhoto 9.2.2 or Aperture 3.2.3 or later.   Photo Stream does work with PC’s, but I will not be covering that here.    Let’s not forget Apple TV, a wonderful way to share your photos, you’ll need at least the 2nd generation Apple TV, running software updates 5.0 or later.  

The Photo Stream option on your iOS devices is located in the iCloud Setting.  To start using it, go into Settings, find and tap the iCloud setting, scroll down a bit and you’ll find the Photo Stream option, simply turn it on and start taking pictures with your device!  On your Mac, you’ll open up System Preferences, click the iCloud preference, and similar to your iOS device(s), you’ll turn Photo Stream on.  Now there is one additional step you’ll need to take on your Mac, you’ll go into iPhoto, or Aperture, and within either of those apps, you’ll turn Photo Stream on there as well.  


Now let’s talk about getting pictures in your Photo Stream, how many you can have there, how long they stay there, do pictures count against my iCloud storage etc.  Apple states that you can have up to 1000 pictures in your Photo Stream at any given time.  Apple also says you can have those pictures in your Photo Stream for 30 days.  The pictures in your Photo Stream DO NOT count against your iCloud storage, very important to remember for those who are backing up their devices to iCloud.

Deleting pictures from your Photo Stream on your iOS device is quite simple, and there are two ways to accomplish it.  You can delete a single picture by clicking on the picture, then tapping the garbage can (lower right corner of screen).  Or you can delete multiple pictures.  To do this, you tap the Edit button (top Right), then tap the pictures you wish to delete, then tap the Delete button (bottom right).  On your Mac, deleting a Photo Stream pictures is also very easy.  Either within iPhoto or Aperture, click on the Photo Stream option.  You can delete single pictures, or multiple pictures from Photo Stream, just as you would if you were in an Events/Photos/Faces or Places (iPhoto).  

Now let’s talk about sharing your photos from Photo Stream.  This is a new option that became available in the fall of 2012 with the release of iOS 6.   Shared Photo Streams  can also be created on your Mac, running OSX 10.8.2 or later with Aperture 3.4 or later or iPhoto 9.4 or later (you could and some people do, use both).   Shared Photo Stream(s) rock!  


To turn on Photo Sharing, tap on the Photo Stream option, and make sure the Photo Sharing toggle is set to on.  One great feature of the shared Photo Stream is that is can be shared with non Mac or non iOS devices, thank you Apple!  When you share a Photo Stream, it becomes a private website that you share by providing email addresses to those you wish to share it with.  Here’s how you do it.  On your iOS device, you’ll go into the Photo’s app, and choose Photo Stream, then you choose the pictures you wish to share by clicking the edit button (top right), tapping the photos, then choosing the share option, lower left of your screen.  When you click share, you have six options to share your pictures.  Via Message, another Photo Stream, Facebook, Print, Copy or Save to Camera roll.  We are going to click the Photo Stream option.  Next, click New Photo Stream, type the email addresses (or if you have them in your contacts, simply type the persons name and pick their email address).  Create a name for your Photo Stream, then you can choose whether or not you wish to make this Photo Stream public, or only viewable by those whose email you provided.  If the Photo Stream is NOT created as a public website, those people who were emailed your link, MUST  be using that email address as an Apple ID in order to view the Shared Photo Stream, this is very important.  If you make the Photo Stream public, it can be viewed by anyone, regardless of whether or not their email is an Apple ID or not.   To create a shared Photo Stream in iPhoto, from your library, choose the pictures you wish to share, click the Share option (lower right), choose Photo Stream, enter the names (or email addresses) of those you wish to share the Photo Stream with and the rest as they say, is history!  Those people who you’ve shared your Photo Stream with, who’s email address is an Apple ID, can view the pictures on their iOS device(s), as long as they are running iOS 6 or later, or on their Mac, in iPhoto 9.4 or later, or Aperture, 3.4 or later.  The shared Photo Streams can also be viewed on an Apple TV, running software 5.1 or later.  In case you were wondering, there is a limit to the number of photo’s you can share in a Photo Stream, that number is 1000.  Also, shared Photo Streams never expire, until you delete them…

So, you now know how to share your Photo Streams amongst your friend/family and me should you choose.  Have fun, and until next time, I hope you and your devices are running smoothly!


Read more ►

Why you should go with the new iPad Mini...

1 comments

About a year ago, I wrote a blog on the pros and cons of the iPad Mini.  My biggest complaint at the time was the fact that the Mini's Specs were not on par with the full size iPad.  Well throw all that out the door!  I just went and played with the new Full size iPad Air, and it's nothing short of amazing, in fact if it had the fingerprint scanner that's on the iPhone 5S, I would call it simply "Amazing".  Why am I bringing up the iPad Air here, because, quite frankly, there's no need to go that route any longer...Apple has done an incredible job making the iPad Air smaller, but, now that the iPad Mini has the same specs, I can't see any reason to buy the iPad Air!  It's $100 more and doesn't offer anything but a slightly bigger screen!

The only difference in devices is this:  The iPad Air offers a 9.7 inch display, and the Mini offers a smaller 7.9 inch LED-backlit Multi-Touch display with IPS technology (IPS stands for In Plane Switching, and it provides better viewing while on an angle).   They both have the incredible Retina display that provides 2048x1536 resolution, what you need to know here is that it's better than HD quality.  You also get brand new WiFi antennas, sadly that don't support the new AC standard, but you are getting multiple WiFi antennas to give you better and faster WiFi response.  Also included is the latest in Bluetooth, Bluetooth 4.0.  Last but most important, you are getting the new A7 Chip with 64-bit architecture and the new M7 motion coprocessor (both introduced earlier in the iPhone 5S), and this last bit is THE reason to purchase the Mini, period end of story!  Same all the way around, minus the smaller screen.

Some of you may argue that it's only $100 difference, why not go with the iPad Air?  Think of it in terms of storage.  You can get the new iPad Air, WiFi only, 16GB for $499 (plus tax).  Or, you can get the iPad Mini, 32GB for $499 (plus tax).  Storage is king on these devices, and if you can double your storage, and only give up some screen size, it's a no brainer.  The new Mini is, in my opinion, the way to go.  

Here's a quick look at the front and back...I've made my decision, I hope I've made your easier as well!


Read more ►

What is an AppleID?

0 comments
Getting to know your AppleID

What a lovely spell of cold weather Mother Nature has dumped on us here in Chicago-land, or as we are now known, Chi-Beria!  Thankfully the cold hasn't stopped me from blogging!  Today's blog is inspired by my workshops.  At some of these workshops, I cover what I consider the "Basics" of your iOS Device.  I start in settings, and spend a good deal of time discussing the Apple ID.  Reason being, so many people just don't get it's importance.  So I thought I'd write about it in this edition of The MacMentor's blog, and how it ties into what I call, The Apple Ecosystem.

Apple has created quite a wonderful system for all it's device owners.  It started some 14 years ago with the introduction of the iPod and iTunes.  In order for the music you purchased to be tied to the correct device(s), Apple created the Apple ID.  Then a few years later along came iPhone and iPad,  all tied together using your Apple ID.  All part of the Apple Ecosystem.

Apple’s ecosystem consists of  your devices (Mac, iPhone, iPad, iPod Touch) as well as iTunes, iCloud, iMessage and FaceTime.  The key to the Apple ecosystem is the Apple ID.  Your Apple ID is an email address that Apple uses as a pointer to what I call "Your Apple locker".  Your locker of content within the Apple ecosystem.  Your Apple ID  is what you will use to sign in to the iTunes Store, Mac App Store, iCloud, iMessage and FaceTime.  When purchasing content through iTunes, your Apple ID tells Apple who’s “locker” the content should be assigned to, as well as what devices your content can be shared with.  It's how Apple knows not to assign my purchases to someone else's device(s).  With iCloud, your Apple ID is what Apple uses to push or sync your non entertainment content (Notes, Reminders, Calendar events, Contacts) to all your iCloud enabled devices.   

Another great part of this ecosystem, and a feature that I love is iMessage. 


I'm sure you've all texted from your iPhone.  Did you know you can text to and from your iPad, iPod Touch and your Mac using iMessage?  Oh yeah, did I mention it’s FREE!  That's right folks.  Take a quick look at your Message App on your iPhone.  Click on any message.  It's either Blue or Green.  Do you know why that is?  The green texts are texts that are not going through iMessage.  The blue texts are being sent through iMessage.  I can see you all shaking your heads going, ah that explains it!  How's this for fun.  Apple is basically giving the phone companies the "Bird" (middle finger) with iMessage.  A free way to text.  Of course it's only free to those on Apple devices, but if your whole family is on them, you can get rid of your texting on your cellular bill.  Nice.  

Now let's discuss FaceTime.  FaceTime is the video chat feature of Apple’s ecosystem, that got a great update with iOS 7 and Mavericks and now has what's called FaceTime Audio. 


FaceTime Audio let's you make voice calls through the Apple Ecosystem.  Really?!?!  Do you see what Apple is doing here?  Providing you with ways to no longer have to pay for cellular calls, or texting.  Go Apple!  So how does FaceTime work?  Simple, you sign into FaceTime with your Apple ID and you use the FaceTime App to video chat with anyone else who has a FaceTime capable device.  Real life story.  Last summer, my daughter was in Israel.  From a Kibbutz, she used her iPhone to FaceTime me.  Do you know how much it cost?  NOTHING!  It was completely FREE.  A video call from Israel to Deerfield and it was Free!  Can't beat that with a stick...

Ok, that’s a high level of what your Apple ID does for you within the ecosystem, now let’s break it down further first by iTunes, and the Mac AppStore, then iCloud and iMessage.  

iTunes is the heart of the Apple Ecosystem.  It came to life Thirteen years ago, in January of 2001.  iTunes is where you purchase entertainment for your Apple Devices.  What started out as a cool place to buy and store your music has evolved into an incredible online entertainment store, where you can not only buy music, but movies, TV shows, Apps for your iPhone/iPad/iPod touch and much more.  You can even take classes from many of the top Universities around the world through iTunes U!  Whichever device you choose to purchase entertainment content from, you are required to enter your Apple ID (and password).  This allows Apple to correctly share that content to the proper devices.  The Mac App Store works the same way as iTunes, only it’s content is specific to Mac computers, where iTunes content can be used on all Apple devices, and on PC's.

Now on to iCloud.  The iCloud service is Apple’s latest attempt at cloud storage and syncing, and it blows away its predecessor, MobileMe.  What iTunes is for entertainment content, iCloud is for your personal, non-purchased content.  The iCloud service is available on all Mac’s running at least OSX 10.7 and all iOS devices running at least iOS 5.0 (I hope you are all at iOS 7!!).  To enable iCloud on your Mac computers, you’ll go into system preferences, click the iCloud preference, and login in with, you guessed it, your Apple ID! 


On your iOS device, you’ll tap on settings, and scroll down to the iCloud setting, tap, and sign in with...your Apple ID!  Then you’ll choose which content you desire to sync and backup through iCloud.  


Now what some people don’t realize is that iCloud can and should be used to back up your iOS device(s)!  Wirelessly!  How does one go about that you ask?  Good question!  All you’ll need is the white cord and power supply that came with your device, an electrical outlet and a wireless network.  Plug the appropriate ends of the cord into the iOS device and the power supply, plug the power supply into the outlet, put your device to sleep ( or let it go to sleep on its own), and if you are connected to a wireless network, iCloud will find your device, when the last backup was initiated and if it was over 24 hours ago, it will back up your device.  Once a day, iCloud will back up your non-purchased content (mail, if you have an iCloud account, Contacts, Calendar events, Reminders, Notes).  


A couple of other great features of iCloud are Photo Stream, Documents and Data and Find my iPhone.  Photo Stream let’s you share pictures, wirelessly, between all your Apple devices.  Now, on your Macs, you be have the appropriate version of iPhoto (which comes on all Macs circa late 2011 and forward).  If you are running an older Mac with OSX 10.7 or later, and have yet to upgrade iPhoto, you will NOT have Photo Stream on your Mac.  Upgrading iPhoto is simple, go to the Mac App Store and download it for $14.99.  Photo Stream will house up to 1000 pictures at a time, for up to 30 days.  Here’s how it works.  You take pictures with your iOS device, and when you get to a wireless network, those pictures get pulled up to iCloud and will be available in your Photo Stream.  So after a day of picture taking, you can come to your Mac and see those pictures in iPhoto, without having to do anything!  Just click on the Photo Stream option in iPhoto and your pictures are virtually there.  If you use the iWork suite of tools (Pages, Keynote and Numbers), iCloud can be used to sync your content from those applications between your devices.  So you can create a Keynote presentation on your Mac, save it to iCloud, and open it on your iOS device, very, very cool!  The Find My Phone service of iCloud is indispensable.  If you’ve misplaced your iOS device, or sadly if it gets stolen, you can log into iCloud.com (with your Apple ID!), and locate it!  That is awesome for those of us who quite often forget where we leave our devices!  It works using the GPS on your device to locate and display that information to a Map on iCloud.com, very cool!  I once had a customer who had her phone stolen, and we were able to track it on iCloud.com.  We called the police, informed them of where it was, they tracked down the perpetrator and got my client her phone back!  Technology at work!

That friends, is a high level overview of your AppleID, the Apple ecosystem and it’s benefits.  For more in depth help, please contact me to set up an appointment!

Enjoy your day, and until next time...Best to you and your devices!


Read more ►
 

Copyright © Need a Smartphone Design by O Pregador | Blogger Theme by Blogger Template de luxo | Powered by Blogger